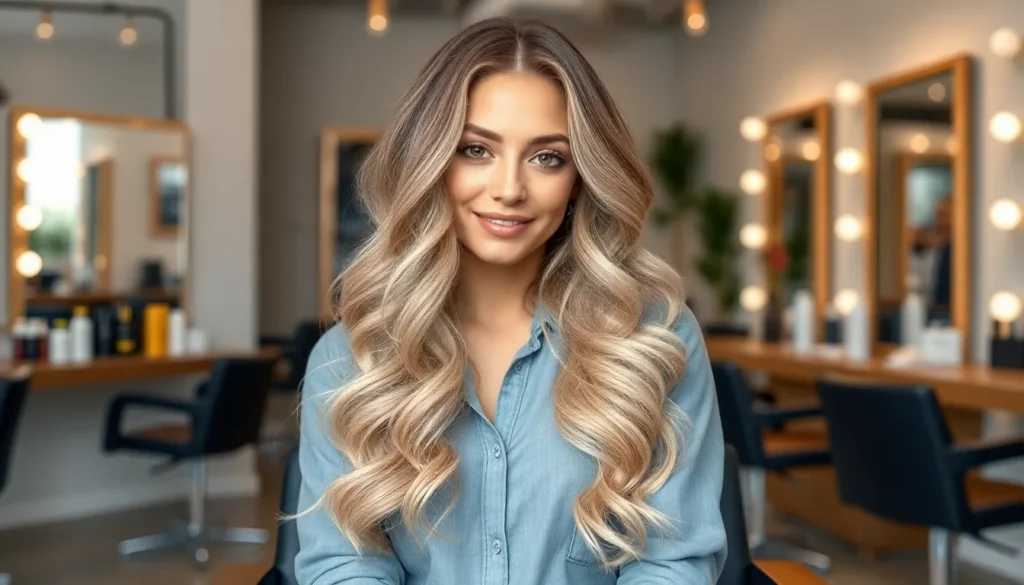
We’ve all dreamed of that perfect sun-kissed hair that looks effortlessly natural yet impossibly gorgeous. That’s exactly what babylights deliver – the most subtle and sophisticated highlighting technique that’s taking salons by storm. Unlike traditional highlights that can look chunky or obvious, babylights mimic the way sunlight naturally lightens children’s hair with ultra-fine, delicate strands.
This revolutionary coloring method creates dimension and movement without the harsh lines or dramatic contrast you’d see with conventional highlights. We’re talking about microscopic sections of hair that are lightened just a few shades, resulting in that coveted “I just spent the summer at the beach” glow.
Whether you’re looking to add subtle brightness to your natural color or enhance existing highlights, babylights offer the perfect solution for anyone wanting low-maintenance glamour that grows out beautifully.
What Are Babylights and How Do They Differ From Traditional Highlights
Babylights represent a revolutionary highlighting approach that creates the most natural looking color enhancement possible. This technique transforms your hair with subtle sophistication rather than dramatic contrast.
Definition of Babylights Technique
Babylights involve applying color to extremely thin sections of hair using ultra fine weaving techniques. Colorists select strands that are approximately half the width of traditional highlights, creating microscopic pieces throughout your hair. Professional stylists use specialized foiling methods to isolate these delicate sections during the lightening process. Each strand receives precise color placement that mimics how natural sunlight would lighten your hair over time. The technique requires advanced skill since working with such fine sections demands exceptional precision and artistry.
Key Differences Between Babylights and Regular Highlights
Strand thickness creates the most obvious distinction between these highlighting methods. Traditional highlights use sections that are 3-5 times thicker than babylights, resulting in more noticeable color bands. Placement patterns differ significantly since babylights require random, scattered positioning while regular highlights often follow predictable sectioning patterns.
| Feature | Babylights | Traditional Highlights |
|---|---|---|
| Strand Width | Ultra fine (1-2mm) | Medium to thick (3-8mm) |
| Color Contrast | Minimal (1-2 shades) | Moderate to high (2-4 shades) |
| Processing Time | 3-4 hours | 2-3 hours |
| Maintenance Frequency | 3-4 months | 6-8 weeks |
| Cost Range | $200-400 | $100-250 |
Color intensity varies dramatically between the two techniques. Babylights typically lighten hair only 1-2 shades from your natural base color, while traditional highlights can lift 2-4 shades or more. Maintenance schedules favor babylights since the subtle regrowth blends seamlessly with your natural color.
Why Babylights Create a More Natural Look
Babylights replicate the way sunlight naturally lightens children’s hair through scattered, random placement. Natural hair lightening occurs in irregular patterns where sun exposure hits different angles and surfaces. Traditional highlights can appear artificial because they follow geometric sectioning that doesn’t exist in nature.
Color distribution plays a crucial role in achieving authenticity. Babylights scatter throughout your hair in unpredictable ways, similar to how natural lightening would develop over months of sun exposure. The ultra fine strands blend imperceptibly with your base color, creating dimension without obvious contrast lines.
Reflection patterns enhance the natural appearance since many tiny highlights catch light from multiple angles. This creates a luminous glow that appears to come from within your hair rather than sitting on top of it. Traditional highlights often reflect light in more predictable ways that can look manufactured or salon created.
Choose the Right Hair Colorist for Your Babylights

Finding the perfect colorist makes all the difference in achieving those coveted natural babylights. Your hair investment deserves a professional who understands this delicate highlighting technique.
Research Colorists Who Specialize in Babylights
Start your search by examining online portfolios and social media profiles. Look for colorists who consistently showcase babylights work rather than generic highlighting photos. We recommend checking Instagram accounts where stylists tag their babylights transformations with exact hashtags like #babylights or #naturalhighlights.
Read client reviews that mention babylights specifically. General positive reviews don’t guarantee expertise in this particular technique. Search for feedback mentioning “natural looking,” “subtle highlights,” or “low maintenance color” to identify stylists who deliver authentic babylights results.
Ask your network for referrals from people with similar hair types. Someone with fine, straight hair will have different babylights needs than someone with thick, curly hair. Personal recommendations from friends with hair textures similar to yours provide the most relevant insights.
Verify the colorist’s continuing education and certifications. Advanced babylights techniques require specialized training beyond basic highlighting methods. Look for professionals who’ve completed workshops with major color brands or advanced highlighting courses within the past two years.
Questions to Ask During Your Consultation
Inquire about their babylights experience and preferred techniques. A qualified colorist should explain their foiling method, strand selection process, and color placement strategy. We suggest asking how many babylights clients they serve monthly to gauge their expertise level.
Discuss realistic expectations for your hair type and condition. Your colorist should assess factors like your natural color, hair texture, previous chemical treatments, and lifestyle before recommending a babylights approach. They should explain what’s achievable in one session versus multiple appointments.
Ask about maintenance schedules and touch up costs. Professional babylights typically require refreshing every 12 to 16 weeks. Your colorist should provide clear pricing for initial application and future maintenance appointments.
Request to see before and after photos of similar hair types. Generic portfolio images don’t demonstrate how babylights will look on your exact hair color and texture. Ask for examples that match your starting point and desired outcome.
Portfolio Red Flags to Watch Out For
Avoid colorists whose highlighting work shows obvious lines of demarcation. Babylights should blend seamlessly into your natural hair without harsh contrasts or visible bands. Portfolio photos displaying chunky, striped highlighting indicate a lack of babylights finesse.
Be cautious of overly dramatic transformations in portfolio examples. Authentic babylights create subtle enhancement rather than striking color changes. Portfolios featuring extreme blonde transformations or high contrast highlights suggest the stylist favors traditional techniques over babylights subtlety.
Question colorists who can’t distinguish between babylights and regular highlights. Some stylists use these terms interchangeably without understanding the technical differences. A qualified babylights specialist should clearly explain strand thickness, placement patterns, and processing differences.
Watch for inconsistent results across different hair types in their work. A skilled babylights colorist adapts their technique for various textures and colors. Portfolios showing similar results regardless of the client’s starting hair suggest a one size fits all approach rather than customized babylights expertise.
Prepare Your Hair Before Getting Babylights

Proper preparation sets the foundation for stunning babylights results. We’ll guide you through essential steps to ensure your hair is in optimal condition before your appointment.
Deep Conditioning Treatments to Try
Protein treatments should be your first priority if you have damaged or chemically processed hair. We recommend using products containing keratin, collagen, or hydrolyzed wheat protein 1-2 weeks before your babylights appointment. These treatments fill in gaps in the hair cuticle and create a smoother canvas for color application.
Moisture-rich masks work best for dry or brittle hair that needs hydration before highlighting. Apply treatments containing ingredients like argan oil, shea butter, or coconut oil twice weekly for two weeks before your service. Leave these masks on for 20-30 minutes to allow deep penetration into the hair shaft.
Weekly conditioning rituals help maintain hair health leading up to your babylights session. Focus on mid-lengths and ends where hair tends to be most damaged and porous. Consistent conditioning ensures even color uptake and prevents patchy results during the babylights process.
Hair Health Assessment Guidelines
Porosity testing determines how your hair will absorb the babylights color formula. Drop a clean strand of hair into a glass of water and observe how quickly it sinks. Hair that floats indicates low porosity while hair that sinks immediately suggests high porosity requiring adjusted processing times.
Elasticity checks reveal your hair’s strength and ability to withstand the babylights chemical process. Gently stretch a wet strand of hair and observe how much it extends before breaking. Healthy hair should stretch about 50% of its length and return to its original state when released.
Damage evaluation requires examining your hair for signs of breakage, split ends, or chemical stress. Look for rough texture, excessive tangling, or hair that snaps easily when combed. Document these areas to discuss with your colorist as they may need special attention during babylights application.
Color History Documentation Tips
Previous color services must be thoroughly documented including dates, products used, and processing times. Create a detailed timeline of any bleaching, highlighting, permanent color, or chemical treatments from the past year. This information helps your colorist predict how your hair will respond to babylights chemicals.
Home color applications require complete disclosure even if you’re embarrassed about box dye mishaps. Note the brand names, color numbers, and how long products were left on your hair. Metallic salts in some home coloring products can react unpredictably with professional babylights formulas.
Chemical treatment records should include relaxers, perms, keratin treatments, or Brazilian blowouts that might interfere with babylights processing. Bring photos of your hair before and after these services to help your colorist assess the current condition. Timeline documentation prevents potential chemical reactions that could compromise your babylights results.
Select the Perfect Babylights Shade for Your Skin Tone

Choosing the right babylights shade transforms your entire look by harmonizing with your natural skin undertones. We’ll guide you through identifying your undertones and selecting the most flattering babylights colors for a radiant, natural appearance.
Warm Undertones and Best Babylights Colors
Warm undertones appear golden, peachy, or yellow beneath the skin’s surface and pair beautifully with honey-based babylights. Golden blonde shades like champagne and butterscotch create stunning depth without overwhelming your natural warmth. Caramel babylights offer rich dimension that complements olive and medium skin tones perfectly.
Copper-tinted babylights work exceptionally well on warm undertones, adding vibrant yet subtle highlights that catch light naturally. Strawberry blonde variations provide a delicate pink-gold effect that enhances fair skin with warm undertones. Bronze babylights create sophisticated contrast for darker hair colors while maintaining the warm palette harmony.
Avoid ashy or platinum shades that can make warm undertones appear sallow or washed out. Instead, focus on shades with golden, amber, or honey bases that enhance your skin’s natural glow.
Cool Undertones and Complementary Shades
Cool undertones display pink, red, or blue hues beneath the skin and require babylights with ashy or neutral bases. Platinum babylights create striking contrast while maintaining the cool color harmony your skin naturally displays. Silver-toned highlights offer sophisticated dimension that complements fair to medium cool-toned complexions.
Ashy blonde babylights provide subtle lightening without introducing unwanted warmth that conflicts with cool undertones. Beige babylights offer a neutral option that bridges cool and warm territories effectively. Pearl-toned highlights create luminous effects that enhance the natural coolness of your complexion.
Sandy blonde babylights work particularly well for brunettes with cool undertones, providing gentle lift without overpowering contrast. Mushroom brown babylights offer dimensional richness for darker hair while respecting the cool undertone palette.
Versatile Options for Neutral Undertones
Neutral undertones combine both warm and cool elements, allowing for the most flexible babylights color selection. Vanilla babylights provide creamy warmth that doesn’t lean too heavily toward golden or ashy extremes. Natural blonde shades offer classic appeal that complements virtually any neutral undertone variation.
Wheat-colored babylights deliver subtle dimension with slight golden undertones that won’t clash with neutral skin tones. Biscuit babylights create warm depth while maintaining the balanced approach neutral undertones require. Taupe-based highlights offer sophisticated contrast for brunettes with neutral undertones.
Champagne babylights work exceptionally well on neutral undertones, providing luminous lift with gentle warmth. These versatile shades allow for seasonal color adjustments without dramatic changes to your overall look. Mixed babylights techniques using both warm and cool tones create the most natural results for neutral undertone clients.
Understand the Babylights Application Process

The babylights application process requires precise technique and specialized skills to achieve that coveted natural look. Professional colorists follow exact methods that ensure even color distribution and seamless blending throughout your hair.
Sectioning Techniques Used by Professionals
Weaving creates the foundation for successful babylights placement. Colorists use a rattail comb to separate hair into incredibly thin sections, typically taking only 3 to 5 strands at a time compared to traditional highlights that grab 10 to 15 strands. This meticulous approach ensures the ultra fine appearance that makes babylights so natural looking.
Random placement patterns prevent the obvious striping effect seen in regular highlights. Professional stylists avoid systematic sectioning by varying the distance between selected strands, creating an organic pattern that mimics natural sun lightening. They’ll skip sections entirely then concentrate multiple babylights in one area to replicate how sunlight naturally hits different parts of your head.
Diagonal sectioning adds movement and dimension to the final result. Rather than pulling straight horizontal or vertical sections, experienced colorists angle their weaving technique to follow your hair’s natural growth patterns. This creates depth and prevents harsh lines that can make highlights look artificial or chunky.
Strategic face framing sections receive special attention during the babylights process. Colorists typically place more concentrated babylights around your hairline and part areas where the color will be most visible. These front sections often get slightly lighter tones to create that sun kissed glow that draws attention to your features.
Foil Placement Methods for Babylights
Ultra thin foils accommodate the delicate nature of babylights strands. Professional colorists use foils that are approximately half the width of standard highlighting foils, typically measuring 2 to 3 inches wide instead of the usual 4 to 6 inches. This precise sizing prevents color bleeding and ensures each babylight strand maintains its integrity.
Alternating foil placement creates natural color variation throughout your hair. Stylists strategically space foils at irregular intervals, leaving 1 to 3 inches between applications rather than following a predictable pattern. This technique prevents banding and creates the scattered appearance that makes babylights look so authentic.
Tension control during foiling prevents breakage of the ultra fine strands. Experienced colorists apply gentle pressure when wrapping babylights in foil, avoiding the tight pulling motion used for thicker highlight sections. This careful handling protects your hair’s integrity while ensuring proper color saturation.
Overlapping techniques blend multiple tones within individual foil packets. Professional application often involves placing two different shades within the same foil section, creating subtle color gradients that enhance the natural effect. This advanced method adds complexity and depth to your babylights results.
Processing Time and Color Development
Processing time varies significantly based on your starting hair color and desired lightness level. Babylights typically require 20 to 45 minutes of development time, with darker base colors needing longer processing periods. Virgin hair often lifts faster than previously colored hair, requiring careful monitoring to prevent over processing.
Heat application can accelerate color development for stubborn strands. Many colorists use low heat settings with processing caps or infrared lamps to ensure even lifting across all babylights sections. This controlled heat helps achieve consistent results while reducing overall processing time by approximately 10 to 15 minutes.
Strand testing determines optimal processing completion throughout the development phase. Professional stylists check individual foils every 10 minutes, unwrapping sample sections to assess lift levels and color development. This monitoring prevents over processing while ensuring all babylights reach the desired lightness level.
Toner application follows the lightening process to achieve your final babylights shade. Most babylights require toning to neutralize unwanted yellow or orange undertones and create the perfect color match for your skin tone. This secondary process typically adds 10 to 20 minutes to your salon appointment but ensures professional quality results.
Maintain Your Babylights Between Salon Visits

Proper home care extends the life of your babylights and preserves their natural appearance between professional touch-ups.
Color-Safe Shampoo and Conditioner Recommendations
Color-safe shampoos protect babylights from fading by using sulfate-free formulas that cleanse gently without stripping color molecules. Purple shampoos neutralize unwanted brassiness in blonde babylights, while color-depositing formulas refresh tones between appointments. We recommend washing every 2-3 days instead of daily to minimize color loss.
Moisturizing conditioners specifically designed for color-treated hair help seal the cuticle and lock in pigment. Formulas containing ceramides and proteins repair damage from the lightening process while maintaining color vibrancy. Apply conditioner from mid-length to ends, avoiding the scalp to prevent buildup.
Leave-in treatments provide additional protection and hydration for babylight strands. Products with UV filters shield hair from sun damage that can cause premature fading. Choose lightweight formulas that won’t weigh down fine babylight sections or create greasy buildup.
Heat Protection for Highlighted Hair
Heat protectants create a barrier between styling tools and babylight strands to prevent color fade and damage. Thermal sprays with silicone-based formulas coat each strand before blow-drying or styling. Apply these products to damp hair for maximum effectiveness and even distribution.
Temperature control becomes crucial for maintaining babylights since highlighted hair processes heat differently than natural hair. Keep styling tools below 350°F for fine hair and 400°F for thicker textures. Lower temperatures preserve color integrity while still achieving desired styles.
Heat-free styling methods extend the life of your babylights by reducing thermal stress. Braiding techniques, foam rollers, and air-drying methods create volume and texture without compromising color. Incorporate these alternatives into your routine 2-3 times per week to give highlighted strands a break.
Weekly Deep Treatment Schedules
Deep conditioning masks restore moisture and repair damage in babylight strands every 7-10 days. Protein treatments rebuild hair structure weakened by the lightening process, while hydrating masks replenish moisture lost during coloring. Alternate between these two types based on your hair’s exact needs.
Application timing affects treatment effectiveness, with clean, towel-dried hair absorbing products better than dirty or soaking wet strands. Leave masks on for 10-15 minutes with gentle heat from a blow dryer to enhance penetration. Rinse thoroughly to prevent product buildup that can dull babylight tones.
Professional-grade treatments used at home provide salon-quality results between appointments. Bond-building formulas repair disulfide bonds broken during lightening, while glossing treatments refresh color and add shine. Schedule these intensive treatments monthly to maintain optimal babylight health and appearance.
Style Your Hair to Show Off Babylights

Now that you’ve invested in beautiful babylights, we’ll help you showcase their natural dimension through strategic styling. Proper styling techniques can amplify the subtle beauty of your babylights and create stunning visual depth.
Hairstyles That Enhance Babylights Dimension
Long layers work exceptionally well for displaying babylights throughout your hair’s length. Cut your hair in face framing layers that cascade naturally to create movement and allow light to catch each highlighted strand. Textured layers prevent your babylights from hiding beneath flat sections of hair.
Beachy waves showcase babylights dimension better than any other hairstyle. Create loose, tousled waves using a curling iron or braiding damp hair overnight. The varied texture allows different babylights strands to peek through and catch light from multiple angles.
Side swept bangs frame your face while highlighting the babylights around your hairline. Ask your stylist to cut wispy, graduated bangs that blend seamlessly with your face framing babylights. Avoid blunt bangs that can hide your forehead’s babylights placement.
Braided updos display babylights in unexpected ways throughout intricate patterns. Try loose fishtail braids, messy buns with pulled out pieces, or crown braids that weave babylights strands together. These styles create depth and visual interest while showcasing your color investment.
Half up styles combine the best of both worlds by displaying babylights in the top section while keeping length visible. Pull the top half of your hair into a loose bun or twist while leaving the bottom layers flowing. This technique highlights face framing babylights while maintaining overall dimension.
Blow Drying Techniques for Maximum Shine
Round brush blow drying creates the smoothest finish for reflecting light off babylights strands. Use a medium barrel round brush to lift hair at the roots while directing airflow down the hair shaft. This technique seals the hair cuticle and maximizes shine potential.
Cool shot finishing locks in your blow dry style while improving babylights luminosity. After completing your blow dry with warm air, blast each section with cool air for 10-15 seconds. Cool air closes the hair cuticle and creates mirror like shine that makes babylights appear more vibrant.
Sectional drying ensures even heat distribution and prevents babylights from becoming damaged. Divide your hair into 6-8 sections and completely dry each section before moving to the next. This method prevents overheating and maintains the integrity of your babylights color.
Root lifting technique adds volume that allows babylights to move freely and catch light. Use a paddle brush to lift sections straight up while directing warm air at the roots. Lift each section for extra volume that showcases babylights throughout your hair’s movement.
Ionic blow dryers reduce frizz and enhance babylights shine better than traditional dryers. These tools break down water molecules faster and seal the hair cuticle more effectively. Invest in a high quality ionic dryer to maximize your babylights investment.
Curling Methods to Display Color Variation
Varied curl sizes create the most natural looking babylights display throughout your hairstyle. Alternate between 1 inch and 1.5 inch barrel sections randomly to mimic natural hair texture. Different curl sizes allow various babylights strands to catch light at different angles.
Curl direction alternating adds dimension that showcases babylights placement beautifully. Curl some sections away from your face and others toward your face in an irregular pattern. This technique creates natural looking movement that highlights your babylights investment.
Finger combing curls breaks up uniform curl patterns while maintaining babylights visibility. After curling, gently run your fingers through each curl to soften the texture. This creates piece-y definition that allows individual babylights strands to stand out.
Pin curl setting helps curls last longer while maintaining babylights dimension throughout the day. After curling each section, immediately pin it to your head in the curl formation. Allow curls to cool completely before removing pins and styling as desired.
Sea salt spray application enhances curl texture while adding grip that showcases babylights definition. Spray damp hair with sea salt texturizing spray before curling to create beachy texture. This product adds hold without weighing down your babylights’ natural movement.
Refresh Your Babylights at the Right Time

Maintaining your babylights properly ensures they continue to deliver that natural, sun-kissed glow we all love. Timing your touch-ups correctly preserves the seamless blend and prevents obvious regrowth lines.
Signs Your Babylights Need a Touch-Up
Visible root regrowth becomes the most obvious indicator that it’s time for a refresh. We typically notice this around the 8 to 12-week mark when your natural color creates a clear line of demarcation against the lightened strands.
Color fading occurs when your babylights lose their vibrancy and appear dull or brassy. Environmental factors like sun exposure, chlorine, and frequent washing accelerate this process, making your highlights look washed out.
Loss of dimension happens when your babylights blend too much with your natural color. This creates a flat appearance where the subtle contrast that gives your hair its luminous quality disappears completely.
Brassiness development signals that toner has worn off and underlying yellow or orange pigments are showing through. We see this particularly in blonde babylights that haven’t been properly maintained with purple shampoo treatments.
Typical Maintenance Schedule Guidelines
Every 10 to 14 weeks represents the ideal timeframe for most babylights maintenance appointments. This schedule allows enough regrowth to justify the service while preventing obvious root lines from developing.
Seasonal adjustments work well for many clients who prefer lighter babylights in summer and slightly deeper tones for winter. We recommend scheduling major refreshes at the beginning of each season to keep your color current.
Hair growth rate determines your personal maintenance schedule since everyone’s hair grows at different speeds. Clients with faster-growing hair may need appointments every 8 to 10 weeks, while slower growers can extend to 12 to 16 weeks.
Lifestyle factors influence how often you’ll need touch-ups based on your daily routine. Active individuals who swim regularly, spend time outdoors, or wash their hair daily typically require more frequent maintenance.
Root Touch-Up Vs. Full Babylights Refresh
Root touch-ups target only the regrowth area within 2 inches of your scalp using the same babylights technique. This service takes 2 to 3 hours and costs approximately 60% of a full babylights session.
Full babylights refresh involves reapplying color throughout your entire hair length to restore vibrancy and add new dimension. We recommend this comprehensive service every 6 to 9 months to maintain optimal color saturation.
Toner-only appointments between full services help neutralize brassiness and refresh your babylights without additional lightening. These quick 1-hour sessions can extend the life of your color by 4 to 6 weeks.
Combination services work best for clients who want to add new babylights while touching up existing ones. This approach allows us to enhance your overall look while maintaining the natural growth pattern we’ve established.
Troubleshoot Common Babylights Problems

Even the most expertly applied babylights can develop issues over time. Understanding how to identify and address these common problems ensures your babylights maintain their natural beauty.
Fixing Brassy or Yellow Tones
Purple shampoo becomes your best friend when unwanted yellow tones appear in your babylights. We recommend using it once or twice weekly to neutralize brassiness without stripping your hair’s natural oils. Blue-based shampoos work better for orange undertones that sometimes develop in darker babylights.
Professional toner applications provide the most effective solution for persistent brassiness. Schedule a toner-only appointment every 6 to 8 weeks to refresh your babylights and eliminate unwanted warm tones. Your colorist can customize the toner formula to address exact color shifts in your hair.
Water quality significantly impacts how babylights fade and develop brassiness. Install a shower filter to remove chlorine and mineral deposits that cause color distortion. Hard water particularly accelerates the development of yellow and orange tones in lightened hair.
Heat styling without protection accelerates brass development in babylights. Apply thermal protectant products before using any heated tools and lower your styling temperatures to preserve color integrity. Air drying or using cool settings helps maintain your babylights’ intended tone longer.
Addressing Uneven Color Distribution
Uneven babylights often result from inconsistent sectioning during the initial application process. Professional color correction involves re-sectioning and adding additional babylights to sparse areas for balanced distribution. Your colorist may need multiple sessions to achieve seamless blending without over-processing existing highlights.
Root regrowth patterns can make babylights appear uneven as your natural color grows out. Strategic placement of new babylights during touch-ups helps maintain the random, natural appearance that makes this technique so appealing. We suggest bringing reference photos to show your colorist exactly where you notice gaps or heavy concentrations.
Fading occurs at different rates throughout your hair due to porosity variations. Areas with higher porosity fade faster and may appear lighter or more yellow than intended. Deep conditioning treatments help equalize porosity levels and promote more even color retention across all babylights.
Styling habits contribute to uneven appearance when certain sections receive more manipulation or heat exposure. Rotate your styling patterns and avoid repeatedly pulling hair in the same direction to prevent localized fading or damage that affects color distribution.
Answers for Over-Processed Hair
Deep protein treatments restore strength to over-processed babylights that feel brittle or stretchy when wet. We recommend alternating protein and moisture treatments weekly until your hair regains its natural elasticity and shine. Olaplex or similar bond-building treatments help repair damage at the molecular level.
Trimming damaged ends prevents breakage from traveling up the hair shaft and compromising your babylights. Schedule regular trims every 6 to 8 weeks to maintain healthy lengths and prevent split ends from making your highlights appear dull or uneven.
Gentle cleansing routines protect over-processed hair from further damage while maintaining color vibrancy. Switch to sulfate-free shampoos and reduce washing frequency to 2 to 3 times per week. Co-washing between shampoo days helps maintain moisture without stripping color.
Professional smoothing treatments can restore manageability to over-processed babylights without compromising color. Keratin treatments or similar services seal the hair cuticle and reduce frizz while protecting existing highlights from environmental damage and further processing stress.
Consider Babylights Alternatives and Variations

While babylights create stunning natural-looking dimension, several related techniques offer unique benefits worth exploring. Each alternative provides distinct advantages that might better suit exact hair goals or preferences.
Balayage Vs. Babylights Comparison
Balayage creates a more dramatic sun-kissed effect through freehand painting techniques that place color strategically throughout your hair. Unlike babylights’ ultra-fine strands, balayage uses broader sweeping motions to lighten larger sections, resulting in bolder contrast and more noticeable color variation. This technique works exceptionally well for clients wanting statement highlights that frame the face and add important dimension.
Processing time for balayage typically ranges from 45 to 90 minutes, compared to babylights’ 2 to 3-hour application window. The freehand application allows colorists greater creative control over placement, making balayage ideal for customizing highlights based on your facial features and hair movement. Maintenance requirements also differ significantly, with balayage needing touch-ups every 12 to 16 weeks versus babylights’ 10 to 14-week schedule.
Cost considerations favor balayage for budget-conscious clients, typically running $150 to $300 compared to babylights’ $200 to $500 range. Balayage also offers more flexibility for color experimentation, allowing colorists to incorporate multiple tones and create ombre effects that transition from dark roots to lighter ends.
Foilyage Technique Benefits
Foilyage combines the precision of traditional foiling with balayage’s natural placement for enhanced control over lightening results. This hybrid technique uses foils strategically placed over painted sections to accelerate processing and achieve lighter results than standard balayage alone. Professional colorists can target exact areas for maximum lift while maintaining the organic flow that makes balayage so appealing.
Lightening capabilities with foilyage extend beyond what’s possible with traditional balayage, making it perfect for clients with darker hair who want important color transformation. The foil placement creates heat that opens the hair cuticle more effectively, allowing bleach to penetrate deeper and lift more stubborn pigments. This technique particularly benefits brunettes seeking blonde babylights who need extra lifting power.
Sectioning patterns in foilyage follow natural hair growth and movement, similar to babylights but with broader strokes that create more impactful results. Colorists can customize foil placement to enhance exact areas like face-framing sections or crown pieces, delivering targeted brightness where it matters most. The technique also allows for better saturation control, preventing over-processing in delicate areas while ensuring adequate lightening in resistant sections.
Color Melting for Seamless Blends
Color melting creates ultra-smooth transitions between different shades by blending colors at their meeting points for imperceptible demarcation lines. This technique works particularly well with babylights to eliminate any harsh edges that might develop over time, ensuring your highlights flow seamlessly into your natural base color. Professional colorists use color melting to soften existing highlights and create that coveted lived-in look.
Tonal harmony becomes the primary focus with color melting, as colorists carefully select transitional shades that bridge the gap between your natural color and highlights. The process typically involves applying semi-permanent colors or glazes that fade gradually, maintaining the illusion of naturally sun-lightened hair throughout the grow-out process. This technique extends the life of your babylights by several weeks.
Application methods for color melting include both root smudging and mid-length blending to create dimensional results that appear completely natural. Colorists often combine this technique with babylights refresh appointments, using color melting to perfect the overall look and eliminate any lines that may have developed since your last visit. The result creates hair that looks like you’ve spent months in the sun rather than hours in the salon chair.
Conclusion
Babylights offer the perfect solution for anyone seeking natural-looking highlights that enhance their hair’s dimension without the commitment of dramatic color changes. This sophisticated technique delivers sun-kissed results that grow out gracefully and require minimal maintenance.
Whether you’re looking to brighten your natural color or refresh existing highlights babylights provide versatility that works across all hair types and skin tones. The investment in proper application and quality aftercare pays dividends in long-lasting beautiful results.
We believe babylights represent the future of hair highlighting – a technique that prioritizes subtlety sophistication and natural beauty over bold dramatic changes. With the right colorist and proper maintenance your babylights will continue to enhance your look for months to come.
Frequently Asked Questions
What are babylights and how are they different from regular highlights?
Babylights are ultra-fine highlights that use strands approximately half the width of traditional highlights. They create minimal color contrast and mimic how sunlight naturally lightens children’s hair. Unlike regular highlights that can appear chunky with noticeable color bands, babylights produce a subtle, sun-kissed glow with seamless blending that looks more natural and authentic.
How often do babylights need to be touched up?
Babylights typically require touch-ups every 10 to 14 weeks, making them more low-maintenance than traditional highlights. The exact timing depends on your hair growth rate, lifestyle factors, and how noticeable the regrowth becomes. Some people may need toner-only appointments between full touch-ups to neutralize brassiness and maintain vibrancy.
What skin tones work best with babylights?
Babylights work for all skin tones when the right shades are chosen. Warm undertones look great with honey, caramel, and copper-tinted babylights. Cool undertones are flattered by ashy, platinum, and silver-toned highlights. Those with neutral undertones have the most flexibility and can wear vanilla, wheat, or champagne shades beautifully.
How should I prepare my hair before getting babylights?
Deep condition your hair 1-2 weeks before your appointment using protein treatments for damaged hair or moisture masks for dry hair. Avoid washing your hair 24-48 hours before the service to allow natural oils to protect your scalp. Document any previous chemical treatments or color history to inform your colorist about potential reactions.
Can babylights be done on all hair colors and types?
Yes, babylights can be applied to most hair colors and types, but the technique and processing time vary. Darker hair may require pre-lightening and longer processing times. Your colorist will assess your hair’s porosity, elasticity, and current condition to determine the best approach and achieve optimal results while maintaining hair health.
What’s the difference between babylights and balayage?
Babylights use ultra-fine foils for precise, scattered placement that mimics natural sun lightening with minimal contrast. Balayage involves hand-painting color onto larger sections for a more dramatic, swept effect. Babylights create subtler dimension, while balayage produces bolder, more noticeable highlights with seamless transitions between colors.
How do I maintain babylights at home?
Use color-safe shampoos and conditioners specifically designed for highlighted hair. Apply purple or blue-based shampoos weekly to neutralize brassiness. Use heat protection sprays before styling and limit hot tool temperatures. Deep condition weekly with moisturizing treatments and consider heat-free styling methods to preserve color integrity and hair health.
What are signs that my babylights need a touch-up?
Watch for visible root regrowth (usually after 8-10 weeks), color fading, loss of dimension, or the development of brassy yellow tones. If your highlights no longer blend seamlessly with your natural color or appear dull and lifeless, it’s time to schedule a maintenance appointment with your colorist.